
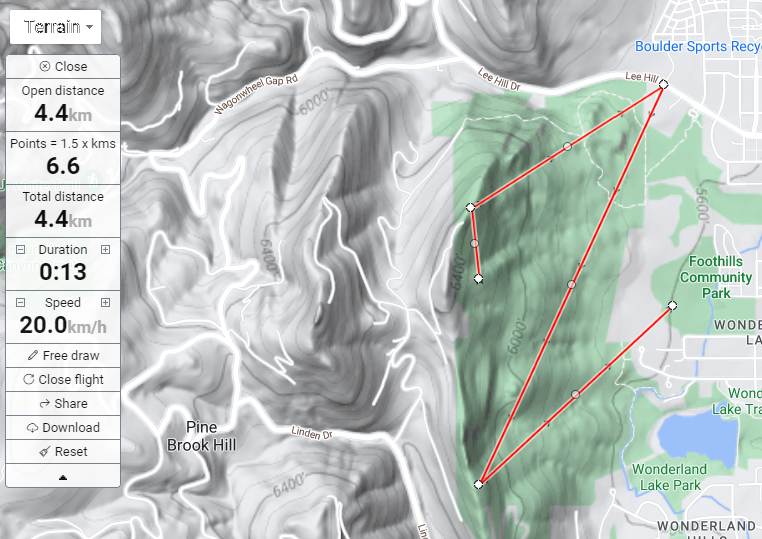
Boulder Free Flight via 3 Turn Points – a soaring challenge.
Difficulty: 1/5
Name of route on XCMap.net: BoFFTProute
Link to FlyXc.app where all waypoint formats can be downloaded (See download instructions in Appendix A): FlyXc.app .
QR code to load directly into XC Track or FlySkyHy:

This should be one of your first challenges after qualifying for your P2. You may have already done this while training.
Main Objectives: Get above the ridge above the North Launch. Launch is at 6300’. The top of the ridge is about 6450’. This task will teach you about your
- glide ratio, the need to …
- top up your height, and how to …
- search for lift in different places.
Descriptions:
TP 1 – North Launch
TP2 – Last house on the North end of the ridge
TP3 – The crossroads of Lee Hill Dr. and 4th Street.
TP4 – South Launch
TP5 – Boulder LZ
Note: All turnpoints have a 200 m radius (400 m cylinder).
Launch (TP 1): Once launched establish yourself in a thermal well clear of the hill until you are above the ridge or do 180s (always turning away from the hill) until you are able to establish yourself in a thermal or are at least 200 m above the ridge.
TP 2 (house): From between 200’ to 500’ above the ridge you should have easily tagged the 2nd TP, the last house on the North end of the ridge. You may need to leave the launch cylinder and then fly back into the 2nd turnpoint cylinder for your instrument to register this TP.
TP 3 (Lee Hill Dr. & 4th St.): After tagging TP 2 you should have an easy and short glide to TP 3, the crossroads of Lee Hill Dr. and 4th Street. You may have never seen this mansion before with the swimming pool. Take a look at the mansion from the air.
TP 4 (South Launch): From TP 3 fly back to the ridge and you may need to top up your height either by soaring the ridge while heading South or by finding a thermal to top up. Places that work for topping up …
The Dog walk park sometimes produces nice thermals and consistent smooth lift if you enter it high enough.
The North end of the ridge works in a NE wind and (surprisingly sometimes) in a SE wind. But Don’t get too close to the North launch gully in a SE wind!
The gully works great in a NE wind, but if you approach it below ridge height only do 180 degree turns to scratch up AND be careful! If you are not comfortable scratching, use #4.
There is almost always lift coming off the lip of the lower launch up through upper launch. Watch the streamers above the upper launch and check the wind direction of North Launch. If the windsock is 45 degrees to horizontal you should have no problem finding lift. Often you can cruise to lower launch, do a couple of 180’s to get to upper launch and then cruise on over to South launch. In a SE wind, when there are ripples filling Wonderland Lake you can almost always cruise over from lower launch gaining altitude as you head toward the treed knoll in front of the South launch.
If you are still below South launch height when you reach the knoll with the trees on it you can do figure of 8 turns (focusing on keeping the wing as flat as possible with plenty of weight shift) in front of the knoll and usually climb up to South launch … if there is wind on the lake. If not … set up for a good approach to land.
When flying a task or challenge do not try to fly straight lines from waypoint to waypoint. You need to choose what is the safest, fastest, and most buoyant line to get from point to point. This often means going back to a thermal you know is there and working or going back to the ridge to find ridge lift. This is most likely the case for getting to TP 4 – South launch.
TP 5 (Goal – LZ): Once you have tagged TP 4 it is an easy glide down to the LZ. You don’t have to land! If you have height, continue to fly, but you score this challenge when you enter the LZ cylinder.
Safety:
Do not do 360s unless you are clear of the ridge.
Do not do 360s where you may sink on the downwind leg of the 360 below ridge height or sink into the rising slope of the hill. (If you have questions ask an instructor, coach or mentor).
Always maintain good height AGL.
Landing Out Challenge (LOC)
Difficulty 2/5
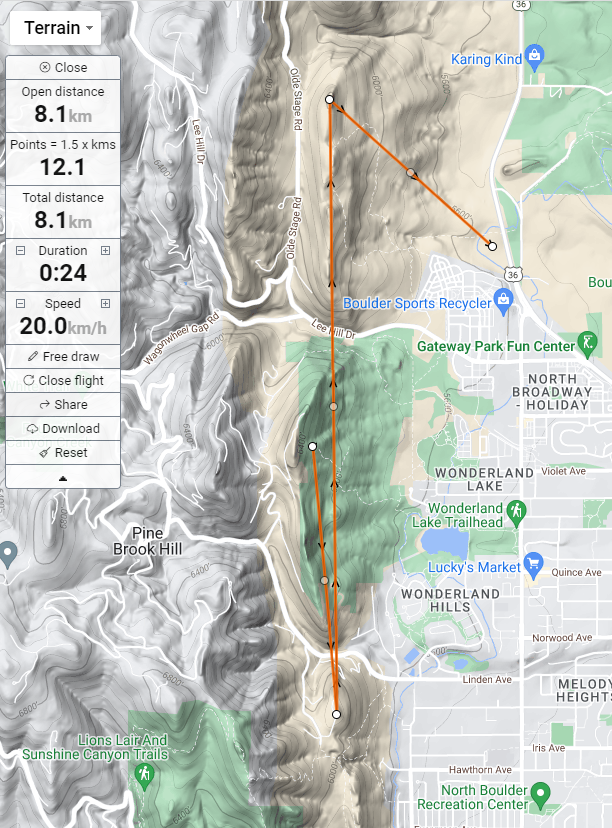
Name of route on XCMap.net: LOC
Link to FlyXc.app where all waypoint formats can be downloaded (See download instructions in Appendix A): FlyXc.app
QR code to load directly into XC Track or FlySkyHy:

Objectives: Get comfortable with landing anywhere else other than the Boulder LZ.
Description: Flying this challenge will be easiest in an East to South East wind. This is a very easy task. It is designed just to get you accustomed to landing out and set you up for flying cross country flights.
Launch North Launch. Launch and either soar or thermal above the ridge. In an Easterly or South Easterly it should be very easy to surf towards South Launch while gaining height.
TP 1 Boulder Ridge Lane (highest point on the ridge South of South Launch). Before crossing over from South Launch to the next ridge to tag TP 1 be sure to climb as high as possible over South Launch. Then go on glide. This is a very easy TP to tag. Once tagged head back towards South Launch and/or North Launch and gain altitude before going on glide towards TP 2.
TP 2 The highest point on the ridge North of North Launch (across Lee Hill Drive). You will often find lift along this ridge. Enjoy exploring this ridge and if you have height continue on past TP 2 always keeping an eye on where you want to land. Keep it within an easy glide.
LZ West of Highway 36. Before landing, and with enough height, be sure to do at least one 360 turn to gauge your drift and the wind direction. You do not have a windsock or other telltales to indicate wind direction and speed. This is key for cross country flying. Always know the wind strength and direction before making your final approach. If you have a flight instrument, be sure you know how to use it properly. Most instruments need 1 or 2 360 degree turns to calculate wind speed and direction if you’ve been flying straight for a while.
*Note: There is a chance that you could receive a ticket for landing here. This is an open space footpath. Feel free to tag the cylinder and then land further North or land here at your own discretion.
Boulder Speedbar Into Wind
Difficulty 3/5
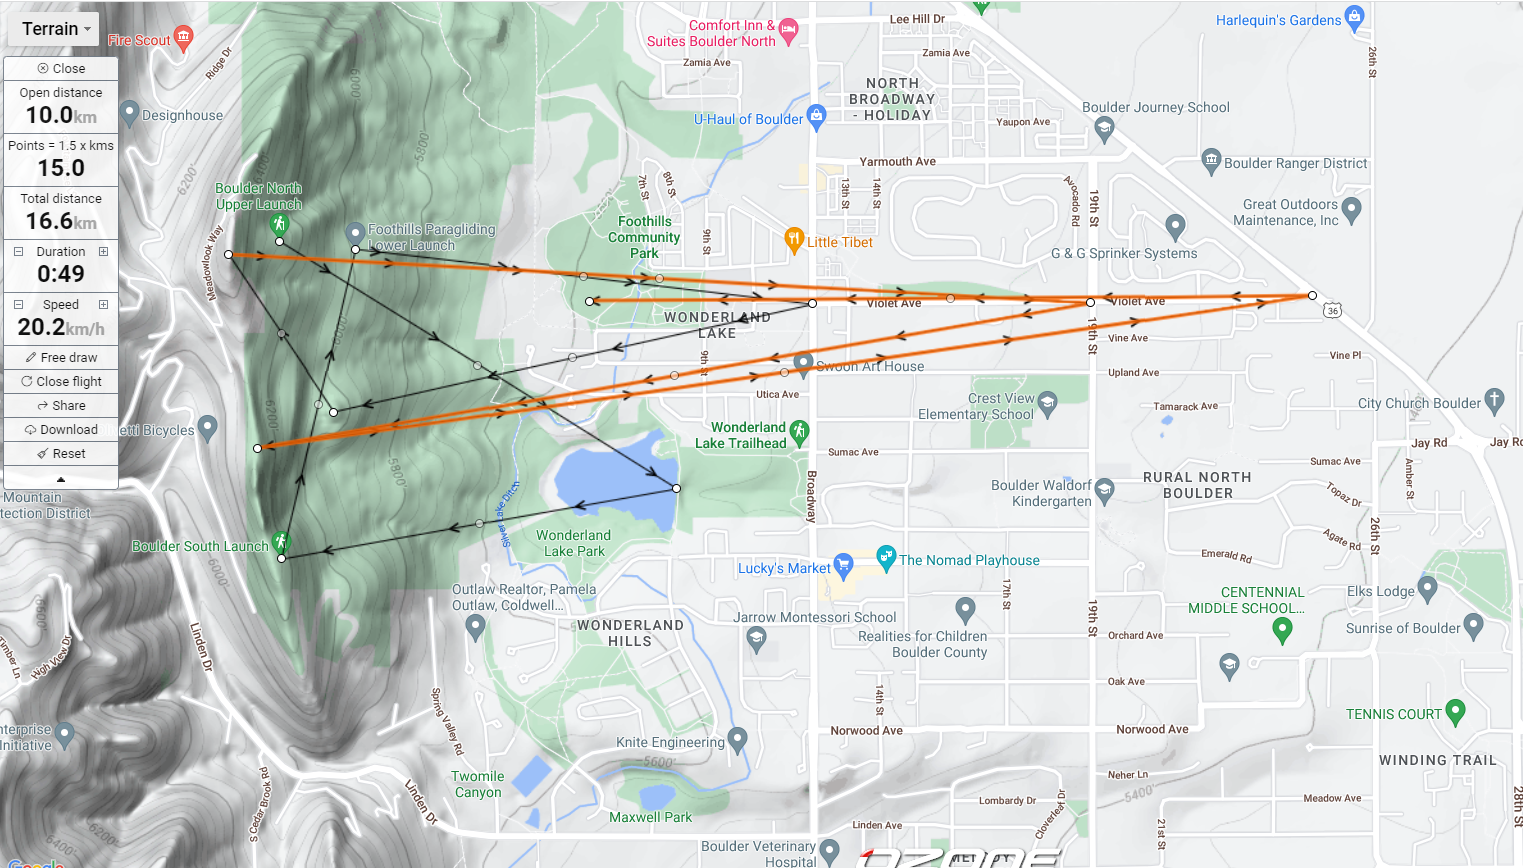
Name of route on XCMap.net: BoSBroute
Link to FlyXc.app where all waypoint formats can be downloaded (See download instructions in Appendix A): FlyXc.app
QR code to load directly into XC Track or FlySkyHy:

Main Objectives: Even though this task looks complicated it doesn’t need to be. The objective is twofold.
1. to explore using your speedbar into the wind.
2. to explore your speedbar flying downwind, or with the wind. It is really unimportant that you follow the task waypoints and arrows. It is more important that you build your observation skills.
Description:
North Launch (6,205’ elevation)
Furthest East edge of Wonderland Lake (5,540’ elevation; 4,368’ distance from N. Launch)
South Launch
Lower Launch
Intersection of Violet and Broadway
The Knoll
The water tank above N Launch
Intersection of Violet and 19th St.
The ridge North of S Launch
Intersection of Violet and 36
The LZ
Launch (TP 1): Once launched, establish yourself in a thermal well clear of the hill until you are above the ridge or do 180s (always turning away from the hill) until you are able to establish yourself in a thermal or are at least 200 m (650’) above the ridge.
TP 2 (E edge of Wonderland Lake): From 500’ above the ridge you should have enough altitude to glide out to the Eastern edge of Wonderland Lake. Do this without speedbar.
Most likely, if there is any Easterly wind you will not make it to the Eastern edge of the lake or back to the hill to top up your height and will have to land.
Repeat with half speedbar going out and return at trim speed (staying connected with the trailing edge – so not 100% hands up). Again, you will most likely not reach the lake before needing to turn back and top up. But if there is sinking air return with half speed bar down wind you will arrive higher on the hill faster and might be able to top up.
There is a 665’ elevation difference between N. Launch and Wonderland Lake which is 4,368’ away. with a glide ratio of 8:1 (it would be unusual to get this good of a glide ratio into wind); how high will you arrive above the lake if you just glided from North Launch without topping up? How high did you arrive above the lake when you used speedbar? (Answers in Appendix B)
TP 3 (South Launch): Return to South Launch and top up your height to at least 500’ above the ridge.
TP 4 (Lower Launch): Fly over to Lower launch before pushing out to TP 5.
TP 5 (Violet and Broadway): Push out using speedbar to the intersection of Violet and Broadway.
TP 6 (The Knoll): Return to the ridge and top up height between the “Knoll” and the water tank above N Launch.
TP 7 (Water Tank): Once you have at least 500’ above the water tank go on bar and try to reach TP 8, the intersection of Violet and 19th Street. You will probably have to top up your height along this line. There is often some lift over the LZ which can help you reach out to 19th street.
TP 8 (19th Street): Once you have tagged TP 8 return on bar to the tree topped knoll by South Launch. If you have a floaty line you may not need bar and returning at trim speed may allow you to arrive higher than on bar. It will depend on the conditions of the day.
TP 9 (The Ridge above South Launch): From the knoll in front of South Launch you should be able to thermal or soar to top up your height and get above the ridge at TP 9. From here continue to thermal and gain as much height as possible for the next turn point. You will need at least 700’ or more above the ridge to push out to TP 10, the intersection of Violet and 36.
TP 10 (intersection of Violet and 36): If you make it here and you are low, just land in the field across from 36. There is very little lift to be found out here so be sure you have enough height for the glide back to the LZ.
Sanitas Challenge
Difficulty: 3/5
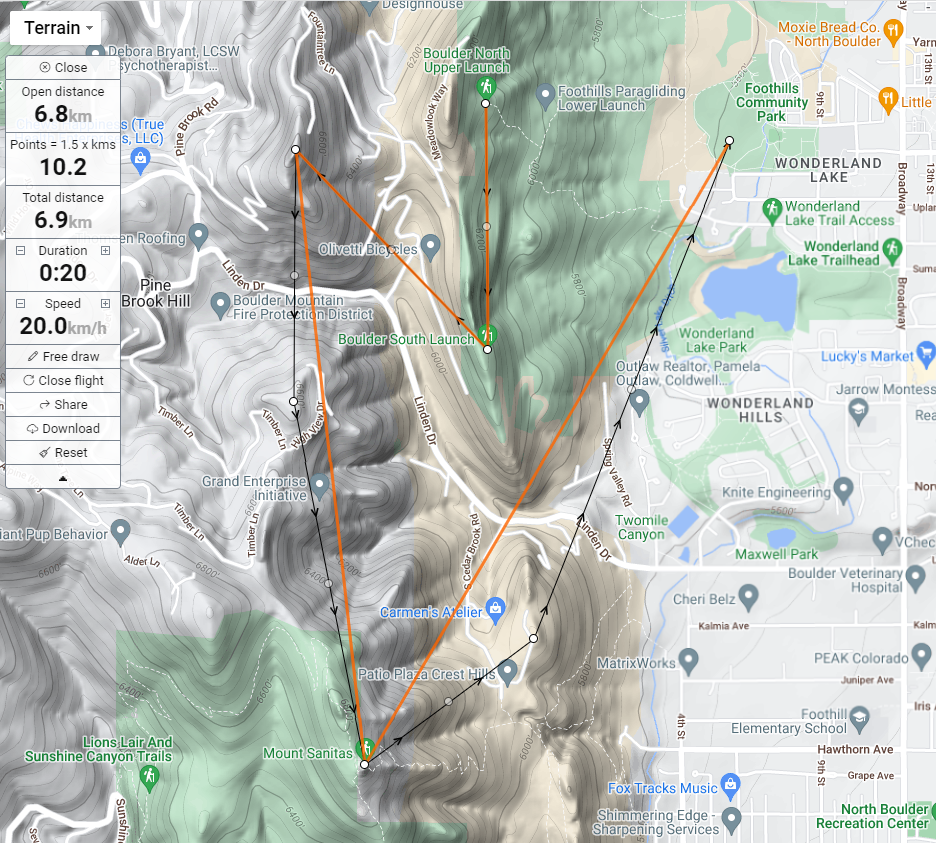
Name of route on XCMap.net: Sanitasroute
Link to FlyXc.app where all waypoint formats can be downloaded (See download instructions in Appendix A): FlyXc.app
QR code to load directly into XC Track or FlySkyHy:

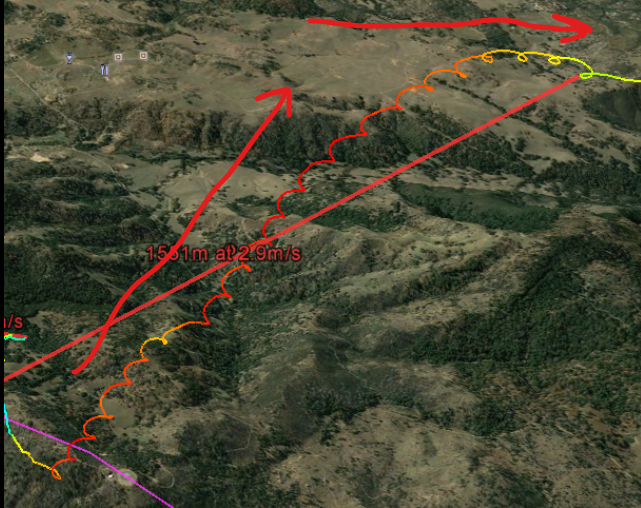
Main Objectives: The Sanitias Challenge is the first step to feel safe and comfortable in attempting to fly to the Flatirons. You need to explore the two front ridges South of South Launch to be able to feel comfortable when trying to make the transition to the Flatirons. This may also be your first flight behind the front ridge. If so, it is mandatory that you have a safe height to enable you to do 360’s without sinking below the ridge into very dangerous rotor. Also, do not attempt this if the winds are strong and the thermals are being shredded (blown back, i.e. more horizontal distance downwind than vertical climbing distance as in the diagram below).
Description: Flying this challenge is best in an East to NE wind.
Launch from North Launch.
TP 1 South Launch: Climb out from North Launch and establish yourself above the ridge. You can do this either by climbing out directly above North Launch in an Easterly or by flying down the ridge to South Launch in a North Easterly and climbing above South Launch. Either way, always watch your drift if thermalling and your ground speed if soaring.
TP 2: TP 2 is the second Ridge behind North Launch. It is unimportant if you climb out from North Launch or above South Launch but tagging this turn point should be fairly straight forward. Just concentrate on getting height, staying centred in your thermal(s) and not drifting so far back that you can’t reach the front of the 1st ridge. You should not do 360’s until you are safely established above the ridge. A safe way to climb out using thermals in front of the ridge is to step your thermals (see diagram below). This will keep you from being blown back too low over the ridge into dangerous rotor.

Image copyright © Flybubble ( https://flybubble.com/ ) used with permission
TP 3: As you head to turn point 3 and then to turn point 4 (Mt. Sanitas) explore, don’t bee line it directly to Sanitas. You need to become familiar with what areas create lift (both turnpoints 2 & 3 are often triggers). You also always need to have a safe exit plan if you find yourself in strong sink. You should always be aware of your glide ratio out front, the strength and direction of the wind (don’t try to push out front into a headwind, go diagonally across it on bar to cover the most distance to escape sinking air).
TP 4: Once you have tagged Mt. Sanitas, congratulations, you have accomplished the task except for landing safely. If you have height you can continue to explore the ridge further South but be aware that the ridge quickly loses altitude though there are sometimes triggers along the ridge. If you are low when you tag Sanitas, then you may need to land out at North Boulder Park which is a safe, though small, bomb out landing zone.
If you do not find a climb on TP 4 Sanitas, then you may need to push out due East and get in front of the 1st ridge before heading back to the main LZ. There are areas on the 1st ridge that do create lift, but it is often small and difficult to core.
LZ: On your way back to the LZ you may need to top up your height by South Launch or by the wooded knoll just past South Launch to enable you to reach the LZ safely. Do not be afraid of landing short along the main gravel path.
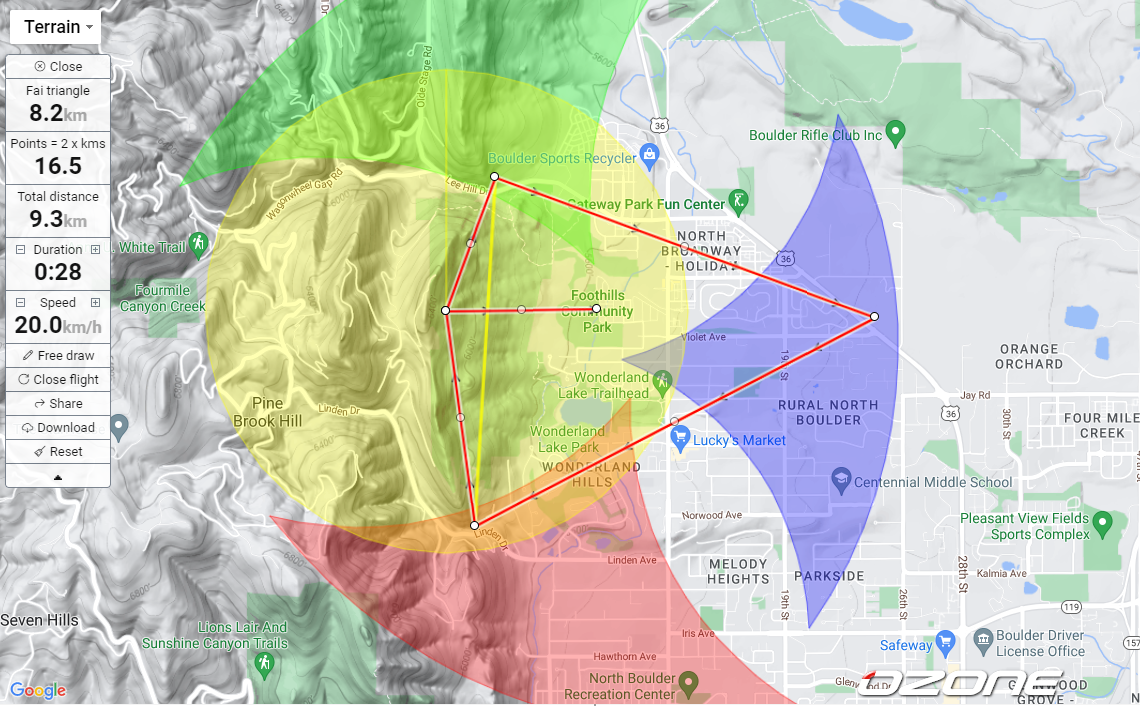
Boulder 16.5 Km FAI Triangle
Difficulty: 4/5
Name of route on XCMap.net: BoNineKmTri
Link to FlyXc.app where all waypoint formats can be downloaded (See download instructions in Appendix A): FlyXc.app
QR code to load directly into XC Track or FlySkyHy:

Main Objective:
To fly your first FAI triangle. Rules and a description of what an FAI triangle is can be found here: XC League or How to Fly a Triangle.
- Launch from North Boulder take off. Gain height.
- TP 1 Fly approximately 300‘ North of Lee Hill Dr.
- TP 2 Fly East following Violet Ave until you cross highway 36.
- TP 3 Fly to the end of the ridge past South launch just before Linden Dr.
- TP 4 Return to North launch (you must be higher than the launch).
- LZ Boulder LZ
Description:
Launch: Once launched, establish yourself in a thermal well clear of the hill until you are above the ridge or do 180s (always turning away from the hill) until you are able to establish yourself in a thermal or are at least 650’ above the ridge.
TP 1 (Lee Hill Dr.): Glide North to the end of the ridge and cross Lee Hill Dr. You may need to leave the launch cylinder and then fly back into the 2nd turnpoint cylinder for your instrument to register this TP. NOTE: Be sure NOT to cross the valley (Lee Hill Dr.) low if there is a strong Easterly flow. Be aware of venturi (wind speed increasing due to constricting flow through the valley) which can blow you into the valley.
TP 2 (Violet Ave & Highway 36): From TP 2 you will most likely need to return to the ridge around North launch and top up your height. From North launch to TP 3 is over 1.8 miles (over 9,600’) and an elevation difference of about 825’. Most gliders can not make this in a single glide (better than an 11:1 glide ratio).
Calculate the height you need in order to make the glide out to Highway 36 AND return! Don’t forget to calculate a head wind. Hint, most competition pilots will calculate between a 6:1 – 8:1 glide ratio between TPs. What will your glider get?
TP 3 (Linden Drive): You may need to fly straight back from TP 2 towards North Launch or the knoll to top up rather than heading directly to TP 3. You can sometimes top up over the LZ, but it is a long glide from highway 36 back to the ridge. Remember, you don’t have to take the most direct routes to turn points. Take the best lines that will keep you in the air the longest.
TP 4 (North Launch): To close an FAI triangle you need to return your original start point, North Launch. From there you have an easy glide to the LZ.
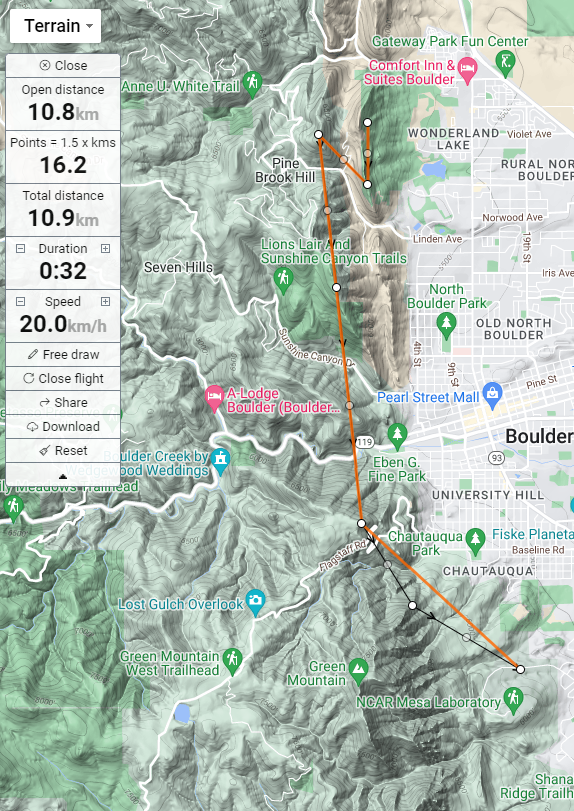
Flatiron Challenge
Difficulty 4/5
Name of route on XCMap.net: FlatIronChal
Link to FlyXc.app where all waypoint formats can be downloaded (See download instructions in Appendix A): FlyXc.app
QR code to load directly into XC Track or FlySkyHy:

Objectives: To Fly the Flatirons! This task will teach you a lot about decision making, judging glide, flying through areas of sink, and active flying.
Description: This task can be intimidating. You should talk with an instructor or mentor before attempting this task. Also, it works best in light Easterly winds, particularly East to North East. Flying over the Flatirons can be extremely turbulent.
Launch. To accomplish the task as written, take off from North Launch. You can, of course, take off from South Launch, then fly to North and return to South Launch as well and the task will score correctly.
TP 1: South Launch. Just soar the ridge to find thermals and gain as much height as you can.
TP 2: As you are thermalling you should easily tag TP 2 as you gain height.
TP 3: Sanitas Mountain. You will need to climb again as high as you can on Sanitas. Mt. Sanitas is 6863’. To reach the 1st Flatiron halfway up it’s slope (approximately 7030’) you will need to climb 2,800’ above Sanitas or more to make it with a glide ratio of 6:1. You have to cover a distance of 15,750’ or 3 miles. Obviously you can find lift as you go to TP 4 Flagstaff. And often you can top up on Flagstaff. But sometimes it doesn’t work. Before leaving Sanitas you should have an altitude of at least 9000’ – 9,500’, particularly if you are flying an “A” or a low “B” wing. Also be very aware of wind direction. On an “A” or “B” wing you will want a due East or North East wind. If you have any head wind (South East) you will have to increase your height to make this transition work.
TP 4: This is the deciding turn point before flying on to the Flatirons. Flagstaff is just over 6800’ and usually there is only sink from Sanitas all the way to the Flatirons. Sometimes you can find thermals coming off of Flagstaff, but they are not reliable and are often rough to core and climb out with. If you are not above Flagstaff by 300’ or more you will not make the middle of the 1st Flatiron and your only safe landing option would be Chautauqua Park and you could face a court hearing and a $200 fine.
If you are approaching Flagstaff and can tell that you are going to arrive below the top, then abort the task and turn back towards North Boulder Park. It is a small, but safe landing alternative.
If you do have more than 300’ above Flagstaff then you can carry on to TP 5 the 1st Flatiron.
TP 5: If all has gone as planned you should arrive at this turn point about halfway up the 1st Flatiron. Around 7030’. From here, depending on the time of day and if the rock is radiating, you may find VERY strong lift around the Flatiron. Push out front to stay safe. Maintain good height. There is usually a band of lifting air out front of the Flatirons that you can continue to soar or climb in, but you may also find yourself sinking out. Do NOT turn back North if you are sinking out. Continue with a South Westerly direction towards NCAR. You can safely land along the road that leads up to NCAR. The road heads due East and it is easy to fly alongside the road and lose height in order for a safe landing even though the ground is gently sloping away from the flatirons.
If you find yourself climbing, feel free to fly all the Flatirons. Be careful if you’re flying in a NorthEasterly wind. If you fly too close to the Flatirons you could encounter rotor on the South side of each one. They are like very sharp spines coming down from Green Mountain. Avoid flying between the 5th Flatiron and the peak of the Green Mountain.
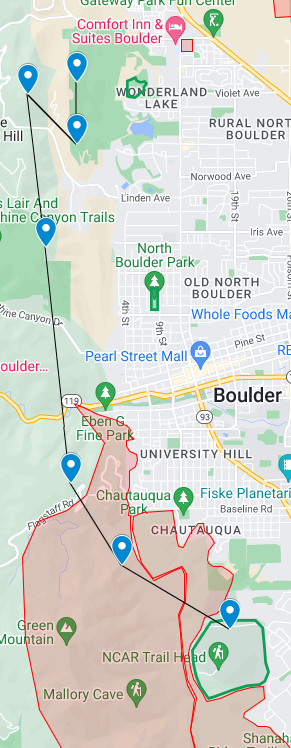
LZ: There are no agreed LZ around NCAR. In the past some people have landed alongside the road that leads up to NCAR. There are not many landing options for us from Sanitas South until you get past the NCAR. Please see the diagram below. All the red areas are NO LZs.
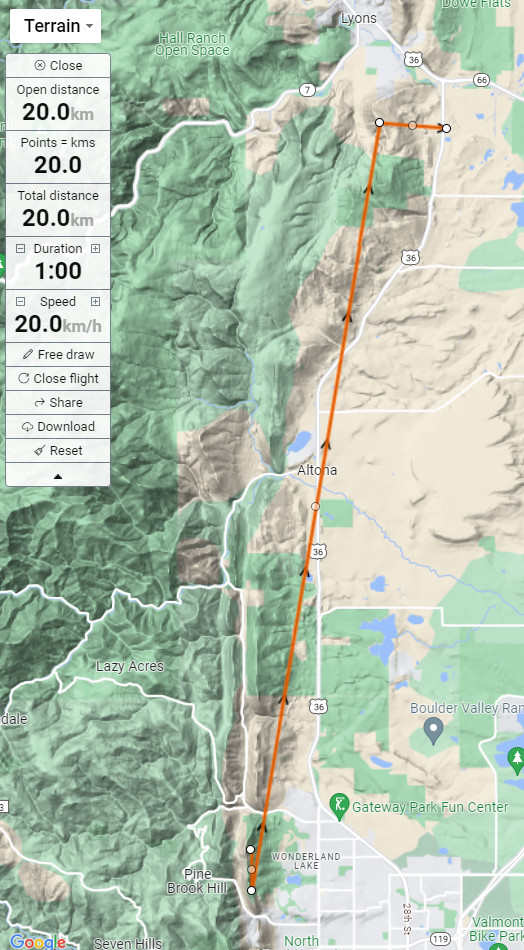
Altona Challenge
Difficulty 3/5

Name of route on XCMap.net: Altona
Link to FlyXc.app where all waypoint formats can be downloaded (See download instructions in Appendix A): FlyXc.app
QR code to load directly into XC Track or FlySkyHy:

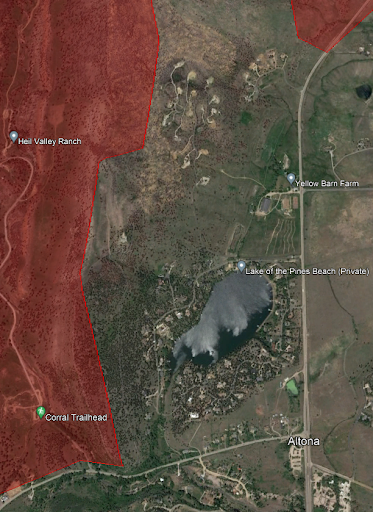
Objectives: Extend the Landing Out Challenge. Learn to read DNL (Do Not Land) files on your instrument (see image below).
Description: Flying this challenge will be easiest in an East to South East wind. This is an easy task. It is designed to extend your XC flying and also learn how to observe and read airspace or DNL files on your instrument.
Launch North Launch. Launch and either soar or thermal above the ridge. In an Easterly or South Easterly it should be very easy to surf towards South Launch while gaining height.
TP 1 is the end of the ridge on South Launch. Just turn in any lift around South Launch and you will eventually tag this cylinder. Climb out here and when you get high enough above the ridge you should be able to drift back into TP 2.
TP 2 The highest point on the ridge behind South Launch. You should be able to continue climbing right through this TP. You should climb as high as possible here (8,000’ in a SE wind, 9,000’ in an E wind) and then go on glide North. Remember, you do not have to fly in a straight line from TP to TP. As you fly North, continue to top up your height all the way to TP 3 at every thermal you come across. There are several triggers along both the front and 2nd ridges.
TP 3 It is important that when you come to TP 3 you have enough height to turn East and fly across highway 36 AND the telephone wires! You can land anywhere on the Eastside of 36. You can actually land on the West side, but it is much more complicated with buildings, power lines and trees. Make it easy on yourself. Maintain height and push out East over the highway. If you have significant height here, just carry on to Lyons. But remember, the DNL becomes even more complicated the further North you go.
LZ Be sure to do at least 1 full 360 high enough so that you can judge the wind strength and wind direction before doing your final approaches. Most vario/GPS instruments require at least 1 360 for the algorithm to calculate wind speed and wind direction after a long straight glide (coming from TP 2 to TP 3).
*Note: Please study the image below showing the red DNL (Do Not Land) area. We can fly over these red areas, but do not land in them. This is not airspace.
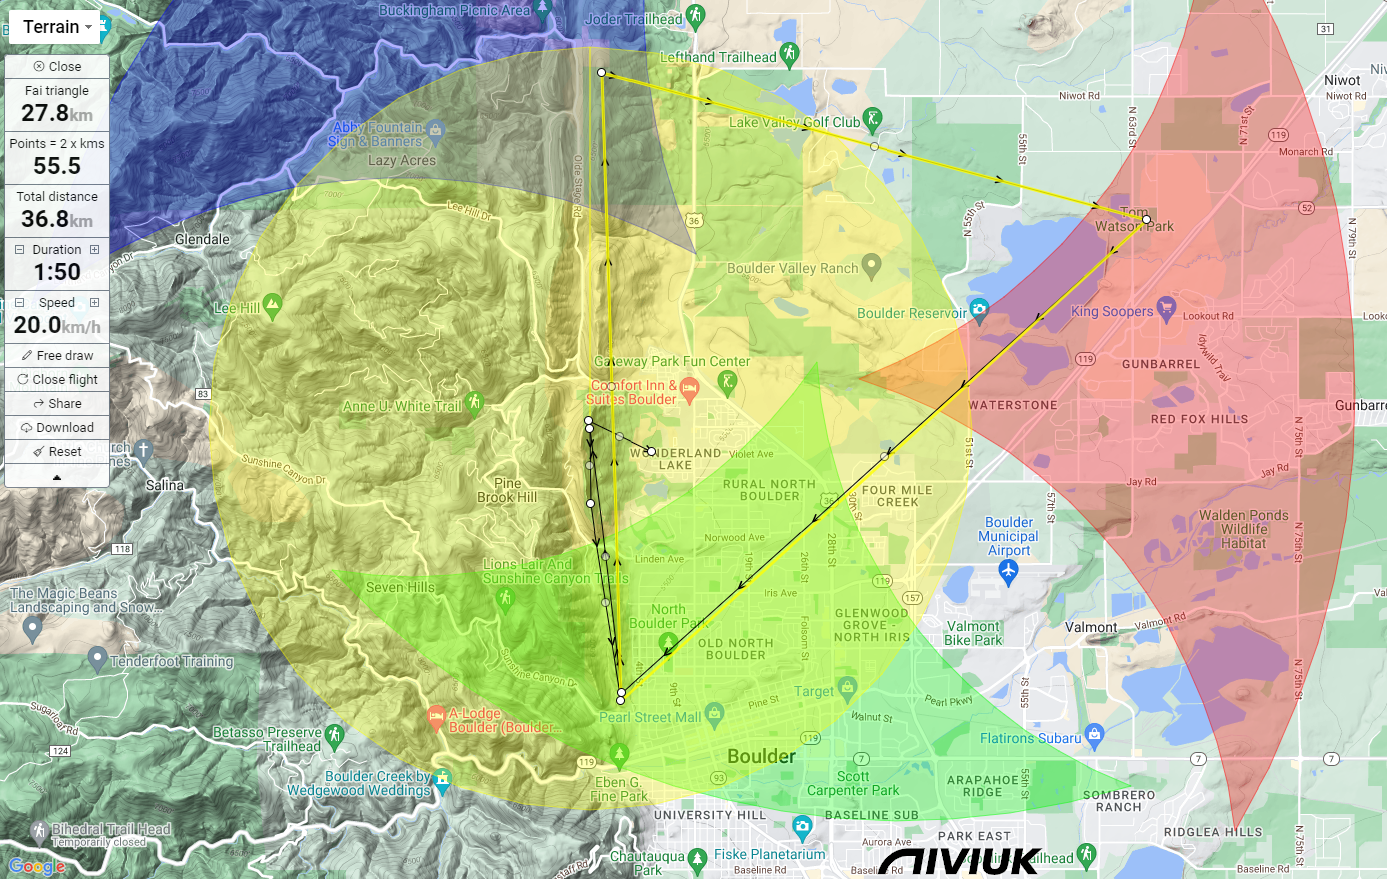
Boulder 36 Km FAI Triangle
Difficulty: 4/5
Name of route on XCMap.net: BoThirty-six
Link to FlyXc.app where all waypoint formats can be downloaded (See download instructions in Appendix A): FlyXc.app
QR code to load directly into XC Track or FlySkyHy:

Main Objective:
This is just a larger FAI triangle to try to get out over Boulder Reservoir and back. Rules and a description of what an FAI triangle is can be found here: XC League or How to Fly a Triangle.
Description:
Launch start from North Boulder take off. Gain height.
TP 1 South Launch
TP 2 End of front range ridge past Sanitas, just before Sunshine Canyon Dr./Maple Ave.
TP 3 Fly North along the ridge past North Launch until you are due West of the North end of Left Hand Valley Reservoir.
TP 4 Fly out to Tom Watson Park (just past Boulder Reservoir).
TP 5 Return to TP 2
TP 6 Return to North Launch
LZ Boulder LZ
Launch: Once launched, establish yourself in a thermal well clear of the hill until you are above the ridge or do 180s (always turning away from the hill) until you are able to establish yourself in a thermal or are at least 650’ above the ridge.
TP 1 (South Launch): Glide South to South Launch, soaring or climbing as much as possible.
TP 2 (Sunshine Canyon Dr./Maple Ave): Get as high as possible on both the front and 2nd ridge and glide down to the end of the front ridge past Sanitas. In a SE wind you will lose height as you push into wind South. North Boulder Park is a great bombout field if needed, but because this is into wind you should only push to this turnpoint when you can easily make it on glide with half bar with enough height to return to your last thermal.
TP 3 Once you’ve tagged TP 2 return to your last thermal (or find a new one), top up and push North past North Launch. There should be 2 or 3 thermals where you can top up and maintain your height on the way North. TP 3 should not be difficult to achieve in a SE wind.
TP 4 (Tom Watson Park): Unless it is a very lifty day out on the flats, you will need to top up your height as much as possible at TP 3 to be able to get out to Tom Watson Park. There are thermal triggers out at Tom Watson Park, but they are not reliable. You will need to be sure you have enough height to glide out to TP 4 AND return! It is 8.2 km from TP 3 to TP 4 in a straight line. Calculate the height you will need to be able to glide out and back. Remember to check your wind direction out at TP 4 before heading to TP 5. If you have a due Easterly or even a South Easterly wind your shortest route back to lift on the ridge would be to fly directly West. DO NOT fly the straight line from TP 4 to TP 5 unless you are 100% sure you will make it. There are NO safe landing options crossing North Boulder before North Boulder Park. If the wind has turned to a North Easterly, then you will have an easy downwinder to get to TP 5.
TP 5 Back to Sunshine Canyon Dr./Maple Ave. This lower part of the front ridge doesn’t generate a lot of lift. There is lift often over the high tension power lines and if you can tag the cylinder and regain height on Sanitas, this is probably your best chance for getting back to North Launch (TP 6).
TP 6 (North Launch). In a South Easterly or Easterly, it should be easy to tag TP 6 after topping up around Sanitas. If the wind has turned NE you should be able to cruise the front ridge. Remember, to tag TP 6 you have to be above or at the same height as when you launched. You can’t tag the cylinder below your start cylinder height for it to score.
Boulder LZ
*Note: When planning and flying your own FAI triangles you generally want to fly the most difficult part of the flight first, or when you think conditions will be the best (mid-day?) and the easier legs when the day is light or dying. So, for this task, depending on the wind direction you may want to reverse the turn point order. For a SE wind you would want to fly the task as described above. But in a NE wind you might want to fly: Launch TP1, TP2 (ridge soaring to gain height), TP4 (North of North Launch into wind), TP5 (cross wind out to Boulder Reservoir), TP3 (South of South Launch), TP1 (North Launch), TP8 (LZ). To score this task in the Boulder Challenges Cup you will need to fly it in the order described above.
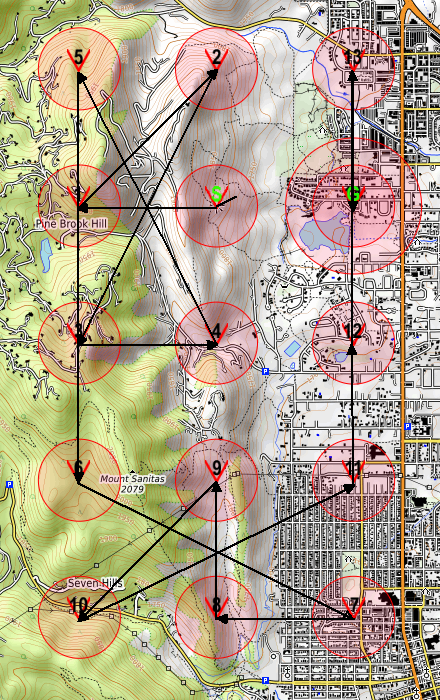
Boulder Grid Challenge
Difficulty: 4/5
Name of route on XCMap.net: BoGrid
Link to FlyXc.app where all waypoint formats can be downloaded (See download instructions in Appendix A): FlyXc.app
QR code to load directly into XC Track or FlySkyHy:

Main Objective:
This grid challenge is designed for days when there is low top of lift but plenty of opportunities to ridge soar and top up height on Boulder’s main triggers. It teaches you to fly with a purpose and with a bit of endurance. It should pose a significant challenge.
Description:
S – Start Cylinder: Start on North Launch and gain height. If you fly directly out of the start cylinder you may need to re-enter it to start the task.
TP 1: Pine Brook Hill directly behind North Launch. You should easily be able to tag this turn point just by thermalling over the main launch and drifting back.
TP 2: Fly North to the end of the North Launch ridge just before Lee Hill Drive.
TP 3: Fly to the hill South of Pine Brook Hill and North of Sanitas. TP 3 is South of Linden Drive.
TP 4: Fly due East from TP 3 to Linden Avenue. If you are low there could be venturi blowing through the valley between the ridges.
TP 5: Fly Northwest, due North of Pine Brook Hill. Be careful here not to get too low. Watch for venturi both from the top of the ridge and from the gap between the ridges where Lee Hill Dr. runs.
TP 6: Fly due South to Sanitas. This TP is due West of the top of Sanitas. You should NOT fly low behind Sanitas, you will be in Rotor. Aim for the front of Sanitas. There is almost always a thermal here in front and thermal up and drift back to tag the waypoint.
TP 7: From TP 6 fly SE to the South end of North Boulder Park.
TP 8: Is due West of TP 7 and North of Mapleton Ave.
TP 9: Fly due North from TP 8. This is still on the front ridge. The center of TP 9 is just past the high tension power lines. There is often a thermal here, but be very careful to keep a safe clearance above the power lines!
TP 10: Fly SW from TP 9 and cross Sunshine Canyon Drive. You will tag the TP before crossing the road. Again, do not fly low here. If you do, you will be below and behind the Sanitas ridge.
TP 11: Fly NE towards Grape Avenue. This is 4 streets North of North Boulder Park.
TP 12: Fly due North and cross Linden Ave to tag TP 12. From here you may need to fly back to the ridge to top up your height in order to get to TP 13.
TP 13: Is 1.3 miles due North of TP 12. Its center is on Zamia Ave.
TP 14: is the End of Speed Section (ESS) and you will cross this TP heading due South from TP 13 and tag it when cross Cherry Ave.
Goal: Carry on through TP 14 crossing Locust Ave and you will have finished the task. BE SURE to leave yourself plenty of height to turn into the LZ to land safely.
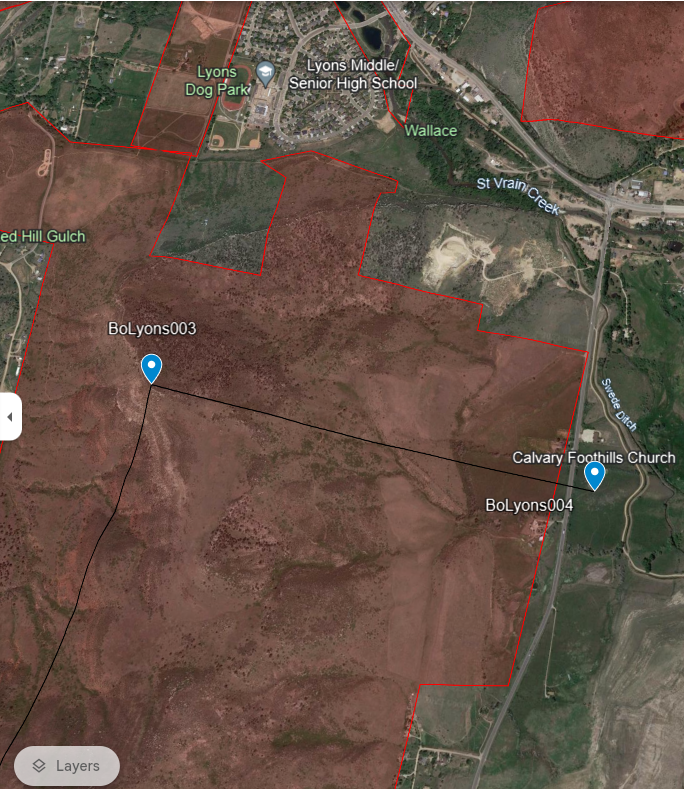
Boulder to Lyons Challenge
Difficulty: 3/5
Name of route on XCMap.net: BoLyons
Link to FlyXc.app where all waypoint formats can be downloaded (See download instructions in Appendix A): FlyXc.app
QR code to load directly into XC Track or FlySkyHy:

Main Objective:
The Boulder to Lyons Challenge is just a continuation of the Boulder to Altona Challenge. It is fairly straight forward and works well on a day with South Easterly winds 10-15 mph.
Description:
S – Start Cylinder: Start on the North Launch and get established on the ridge. In an Easterly or South Easterly it should be very easy to surf towards South Launch while gaining height.
TP 2 The highest point on the ridge behind South Launch. You should be able to continue climbing right through this TP. You should climb as high as possible here (8,000’ in a SE wind, 9,000’ in an E wind) and then go on glide North. Remember, you do not have to fly in a straight line from TP to TP. As you fly North, continue to top up your height all the way to TP 3 at every thermal you come across. There are several triggers along both the front and 2nd ridges. Particularly the ridge behind Altona Lake works well. Be sure to get height here before carrying on.
TP 3 It is important that when you come to TP 3 you have enough height to turn East and fly across highway 36 AND the telephone wires! You can land anywhere on the Eastside of 36 EXCEPT a 1 mile square directly South of Boulder County Open Space (see image below for more details). You CAN NOT land on the West side of 36 except in a couple of limited areas. Be sure to look carefully before setting up your landing to avoid powerlines. Make it easy on yourself. Maintain height and push out East over the highway. If you have significant height here, just carry on towards Rabbie Mountain and Carter Lake.
LZ Be sure to do at least 1 full 360 high enough so that you can judge the wind strength and wind direction before doing your final approaches. Most vario/GPS instruments require at least 1 360 for the algorithm to calculate wind speed and wind direction after a long straight glide (coming from TP 2 to TP 3).
*Note: Please study the image below showing the red DNL (Do Not Land) area. We can fly over these red areas, but do not land in them. This is not airspace.
Appendix A
Instructions to download formats for your instrument from FlyXc.app:
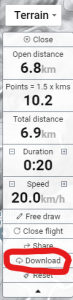
1. Click on “Download” on the left hand menu under “Terrain”
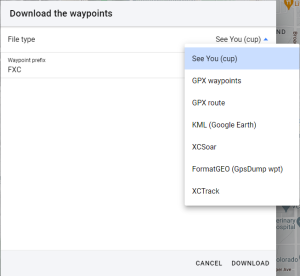
2. Choose File Type appropriate for your instrument from the dropdown menu (cup for SEE You; GPX route for FlySkyHy; KML to view in Google Earth; XCSoar; Format GEO for GpsDump; XCTrack) :
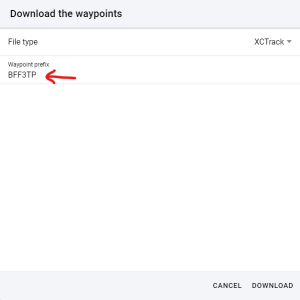
3. Enter in “Waypoint prefix” to help you remember what task the waypoints are for (i.e. BBFF3TP for “Boulder Free Flight 3 Turn Points”):
4. Click Download.
Appendix B
Calculating Glide Ratio
North Launch is 665’ above Wonderland Lake which is 4368’ away. with a glide ratio of 8:1 you would arrive above the East end of Wonderland Lake at 119’. But, flying into an East wind you would be lucky to get 6:1 glide ratio which would cause you to land in the water just shy of the shoreline.
Distance / Height = Glide
Glide Ratio Basics – Bandarra